
新卒インフラエンジニア向け Kubernetes 実践教科書(第2巻 CKA 編)の第7回です。動作確認バージョン: AlmaLinux 10.1 / K8s v1.35.5 / kubeadm v1.35.5(2026-05-24 時点)
- 今ここマップ(第7回 / 全16回 / 第2部)
- 第7回のスコープと設計判断 — sched-demo Namespace で安全に演習する
- taints と tolerations — ノードへの「汚れ付け」と Pod による「許容」
- nodeSelector と nodeAffinity — 配置条件の指定方法を使い分ける
- podAffinity と podAntiAffinity — Pod 間の「近くに置く / 離して置く」制御
- PriorityClass と preemption — 重要 Pod を優先スケジューリングする
- やってみよう①: taint と toleration — 専用ノードを作って確認する
- やってみよう②: podAntiAffinity で 2 レプリカを別ノードに分散配置する
- やってみよう③: PriorityClass を作って Pod に適用する
- まとめ・現場ヒヤリハット・理解度チェック
- シリーズ一覧
今ここマップ(第7回 / 全16回 / 第2部)
今ここ: 第7回 / 全16回(第2部:ワークロード管理)
▓▓▓▓▓▓▓░░░░░░░░░  44%

第1部(クラスタ構築):       ■■■■■ 5/5 回(完了)
第2部(ワークロード管理):   ■■□   2/3 回 ← 今ここ
第3部(ネットワーク):       □□□   0/3 回
第4部(ストレージ):         □     0/1 回
第5部(監視・運用):         □□    0/2 回
第6部(トラブルシュート):   □□    0/2 回
第6回では kubeadm upgrade plan の出力読み取り、ローリングアップグレードの正規手順、そして Pod Pending のトラブルシュート演習を完走しました。Pod Pending 切り分けフローの中で「didn't match node selector → 第7回で学習」と言及した、あの nodeSelector が今回の主役です。
第7回のテーマは Pod スケジューリング です。「なぜ fanclub-api の Backend が常に k8s-wl-01 に偏るのか」——その答えは Kubernetes スケジューラーの動作原理にあります。スケジューラーは Pod を「どのノードに配置するか」を決定する中心コンポーネントです。本回はスケジューラーへの命令書となる taint/toleration・nodeSelector・nodeAffinity・podAntiAffinity・PriorityClass の 5 機構を、kubeadm HA クラスタ上で実際に操作しながら習得します。
本回は安全のため sched-demo Namespace を新規作成して演習し、稼働中の fanclub-api(fanclub Namespace)への影響を完全に排除します。演習終了後は kubectl delete namespace sched-demo でクリーンアップします。
第7回終了時の達成状態:
kubectl taint nodesで taint の付与・削除ができる。effect 3 種(NoSchedule / PreferNoSchedule / NoExecute)の違いを実機で確認できた- toleration の
operator: Equal(キーと値の一致)/operator: Exists(キーの存在のみ)の使い分けを理解した nodeSelector(シンプル・等値一致のみ)とnodeAffinity(required / preferred + 6 種の operator)の使い分けを習得したpodAntiAffinity(topologyKey: kubernetes.io/hostname)で 2 レプリカを別ノードに強制分散できる。「レプリカ数 > ノード数」で Pending が発生するリスクも実機で確認したPriorityClassの作成と Pod への適用(priorityClassName)を習得し、preemption の仕組みを概念で理解した
第7回のスコープと設計判断 — sched-demo Namespace で安全に演習する
本セクションでは、第7回の学習内容と演習設計の判断背景を説明します。「何を学ぶか」と同時に「なぜこの設計にしたか」を理解することで、実務での同様の判断に応用できます。
第7回で「やること」と「やらないこと」
| やること | やらないこと |
|---|---|
| taint/toleration(NoSchedule / PreferNoSchedule / NoExecute) | NodePort / Service の設定変更 |
| nodeSelector と nodeAffinity(required / preferred / 全 operator) | fanclub-api の Deployment 変更 |
| podAntiAffinity(topologyKey: kubernetes.io/hostname) | TopologySpreadConstraints(K8s v1.24 GA・応用機能) |
| PriorityClass の作成と Pod への適用 | クラスタ全体のリソース枯渇による preemption 実機再現 |
| 全演習を sched-demo Namespace で実施 | — |
設計判断の背景
設計判断の背景を 3 点説明します。
判断① sched-demo Namespace で演習を隔離する
全演習を sched-demo Namespace 内で実施し、演習終了後に kubectl delete namespace sched-demo で完全クリーンアップします。これにより fanclub-api(fanclub Namespace)への影響をゼロにできます。Namespace 削除 1 コマンドでクリーンアップが完結するため、第8回以降の演習環境を汚染しません。
判断② podAntiAffinity 演習は nginx test-app で代用する
podAntiAffinity の演習対象は sched-demo Namespace に新規作成する 192.168.1.123:5000/nginx:1.27 Deployment(test-app)で実施し、fanclub-api への podAntiAffinity 追加は行いません。fanclub-api の 2 レプリカが第5回 drain 演習の影響で k8s-wl-01 に集中しており、fanclub-api Deployment に podAntiAffinity を追加するには Helm values 変更が必要になり、本演習のスコープを超えます。test-app を使えば podAntiAffinity の動作原理(2 レプリカ → 2 ノードに分散)を同等に学習できます。
判断③ preemption は概念説明で補完する
PriorityClass の演習は「作成 → Pod への適用 → 優先度フィールドの確認」を実機で行います。実際の preemption による低優先度 Pod の evict は概念解説で補完します。2 Workload Node(wl-01 / wl-02)の合計リソースが潤沢であるため、意図的なリソース枯渇演出が複雑になること、CKA D2 の要求が「PriorityClass の作成・Pod への適用」が中心であることが判断理由です。
第7回終了時点の各 VM 状態(クリーンアップ後)
| VM | 第7回終了時の状態 |
|---|---|
| k8s-cp-01〜03 | kubeadm デフォルト taint のみ(演習追加 taint はクリーンアップ済み) |
| k8s-wl-01 | 演習 taint なし(fanclub-api 稼働継続) |
| k8s-wl-02 | 演習 taint なし(クリーンアップ済み) |
| k8s-ops | sched-demo Namespace 削除済み・PriorityClass 削除済み |
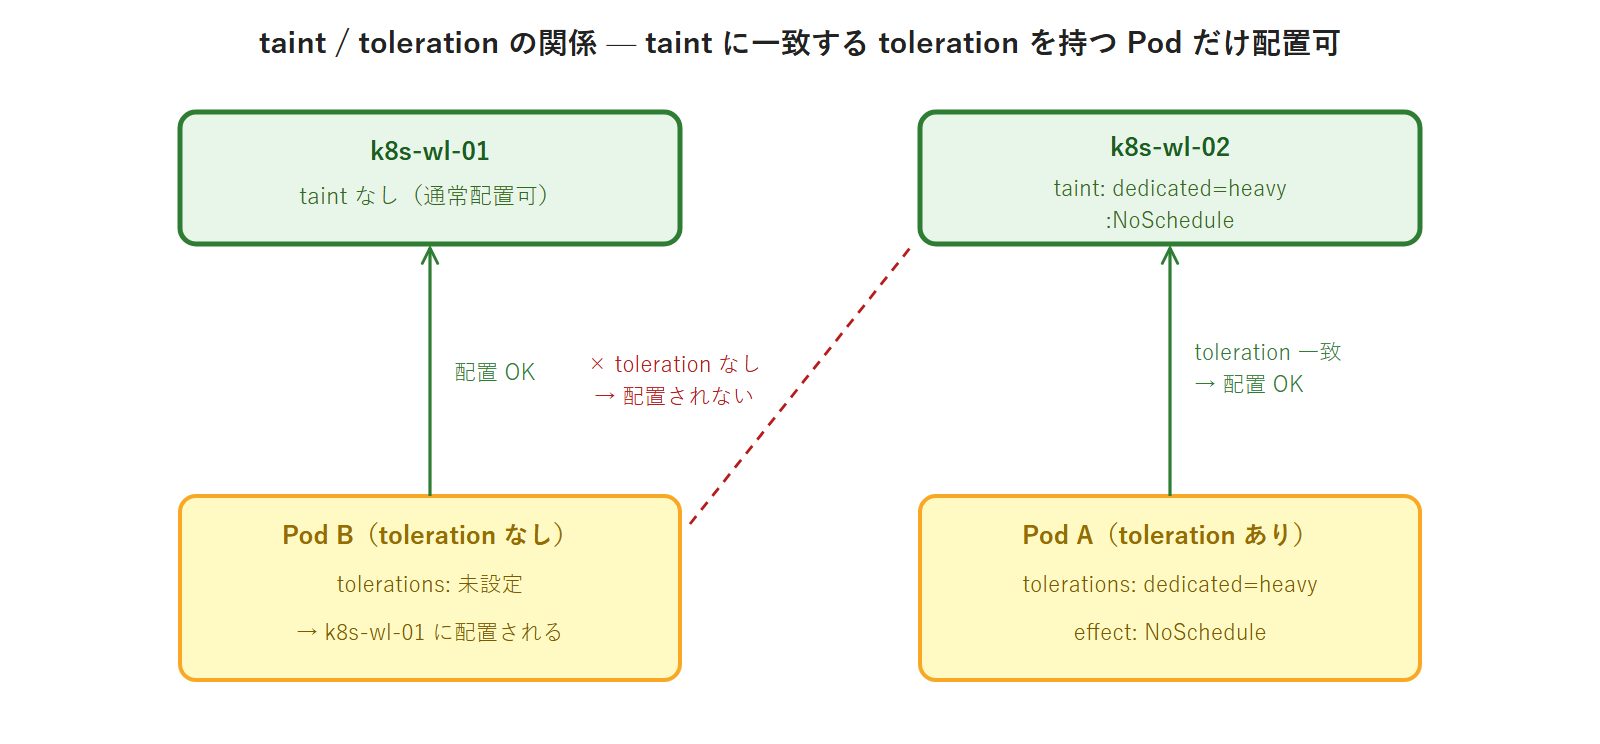
taints と tolerations — ノードへの「汚れ付け」と Pod による「許容」
Kubernetes スケジューラーはデフォルトで「どのノードでも Pod を配置できる」という前提で動きます。しかし実際の運用では「GPU 搭載ノードには GPU を使う Pod だけを配置したい」「メンテナンス前のノードには新しい Pod を乗せたくない」という要件が生じます。この「ノードへの配置制限」を実現する仕組みが taint(テイント) と toleration(トレレーション) です。
taint はノードに付与する「汚れ(拒否マーク)」です。taint が付いたノードには、対応する toleration を持たない Pod は配置されません。toleration は Pod のマニフェストに書く「この taint を許容する(受け入れる)」という宣言です。
effect 3 種の違い
taint には 3 種類の effect があります。特に NoExecute は既存 Pod に影響する唯一の effect であるため、覚え方と動作を正確に把握してください。
| effect | 新規 Pod の配置 | 既存 Pod への影響 | 主な使いどころ |
|---|---|---|---|
NoSchedule | toleration なしは配置されない(ハード制約) | 影響なし | GPU 専用ノード・特定ワークロード専用ノード |
PreferNoSchedule | toleration なしはなるべく配置されない(ソフト制約) | 影響なし | 推奨分離だが強制しない場合 |
NoExecute | toleration なしは配置されない(ハード制約) | toleration なし Pod を即時 evict | ノードメンテナンス前の退避・障害ノードの自動退避 |
CKA 試験対策メモ(NoExecute の自動付与): Kubernetes はノード障害時(node.kubernetes.io/not-ready 等)に系統的に NoExecute taint を自動付与します。これにより障害ノードの Pod が自動的に evict される仕組みが実現されています。この仕組みを理解しておくと、ノード障害後に Pod が別ノードに自動移動する理由を説明できます。
PreferNoSchedule の使いどころ
PreferNoSchedule は「なるべく配置しない」というソフト制約です。NoSchedule と異なり、他に配置できるノードがない場合は PreferNoSchedule taint を持つノードにも Pod が配置されます。本番環境では以下のシナリオで活用されます。
- 移行期間中のノード分離: 新しいノードグループへの移行を段階的に進める場合、旧ノードに
PreferNoScheduleを設定することで新規 Pod を新ノードに誘導しつつ、リソース不足時は旧ノードにも配置させる - 推奨分離だが強制はしない場合: 「できればこのノードを使ってほしくないが、Pod が Pending になるくらいなら使ってよい」という判断のときに使う
CKA 試験では NoSchedule と NoExecute が主な出題対象です。PreferNoSchedule は動作の差(ソフト制約)を問う問題として出題されることがあります。
複数の taint と toleration の組み合わせ
1 つのノードに複数の taint を設定することもできます。その場合、Pod がそのノードに配置されるにはすべての taint に対応する toleration が必要です(AND 条件)。
kubectl taint nodes k8s-wl-02 dedicated=heavy:NoSchedule
kubectl taint nodes k8s-wl-02 env=production:NoSchedule
上記で k8s-wl-02 に 2 つの taint が付与された場合、Pod がこのノードに配置されるには両方の toleration が必要です。
tolerations:
- key: "dedicated"
  operator: "Equal"
  value: "heavy"
  effect: "NoSchedule"
- key: "env"
  operator: "Equal"
  value: "production"
  effect: "NoSchedule"
片方の toleration しか持たない Pod は、もう一方の taint によって弾かれます。このように複数 taint を組み合わせることで「GPU かつ production 環境専用ノード」のような多重条件の分離が実現できます。
kubectl taint コマンドの構文
taint の付与と削除の構文を確認します。
taint 付与の書式:
kubectl taint nodes <node-name> <key>=<value>:<effect>taint 削除の書式(末尾に - を付ける):
kubectl taint nodes <node-name> <key>=<value>:<effect>-構文の注意点は key=value:effect という記法です。key:value:effect ではありません。= はキーと値の区切り、: は値と effect の区切りです。CKA 試験で誤記するケースが多い箇所なので、構文を体に染み込ませてください。
toleration の書き方(operator: Equal / Exists)
toleration には 2 種類の operator があります。
operator: Equal(デフォルト・キーと値が一致する場合に許容):
tolerations:
- key: "dedicated"
  operator: "Equal"
  value: "heavy"
  effect: "NoSchedule"
operator: Exists(キーが存在すれば許容・値は問わない):
tolerations:
- key: "dedicated"
  operator: "Exists"
  effect: "NoSchedule"
全 taint を許容する書き方(DaemonSet でよく使われるパターン):
tolerations:
- operator: "Exists"
operator: Exists で key も省略すると、そのノードのすべての taint を許容します。DaemonSet の Pod(kube-proxy・Calico の calico-node など)はこのパターンを使って CP ノードを含む全ノードに配置されています。
CP ノードの kubeadm デフォルト taint 確認
本演習の前提知識として、kubeadm が Control Plane Node に自動設定する taint を確認します。
実行コマンド:
$ kubectl describe node k8s-cp-01 | grep Taints実行結果:
Taints: node-role.kubernetes.io/control-plane:NoSchedulek8s-cp-02・k8s-cp-03 も同様に node-role.kubernetes.io/control-plane:NoSchedule が設定されています。
なぜ CP に普通の Pod が配置されないのか: kubeadm init 時に Control Plane Node には node-role.kubernetes.io/control-plane:NoSchedule taint が自動付与されます。このため、toleration を書かない限り、一般の Pod は CP に配置されません。kube-system の DaemonSet(kube-proxy・calico-node 等)は operator: Exists の toleration を持つため、例外的に CP にも配置されます。CKA 試験で「なぜ CP に user Pod が乗らないのか」と問われた場合はこの taint が答えです。
toleration の tolerationSeconds — NoExecute の退避タイミング制御
NoExecute taint に対する toleration には、オプションで tolerationSeconds フィールドを指定できます。このフィールドを使うと「taint が付与されてから N 秒後に evict する」という猶予時間を設定できます。
tolerations:
- key: "node.kubernetes.io/not-ready"
  operator: "Exists"
  effect: "NoExecute"
  tolerationSeconds: 300
上記の例では、ノードが NotReady 状態になってから 300 秒(5 分)の猶予後に Pod が evict されます。tolerationSeconds を指定しない場合は即時 evict です。Kubernetes がノード障害時にデフォルトで設定する node.kubernetes.io/not-ready や node.kubernetes.io/unreachable の NoExecute taint に対して、kube-system コンポーネントには長めの tolerationSeconds(通常 300 秒)が設定されています。これがノード障害後も一定時間は kube-system Pod が evict されない理由です。
taint の実務ユースケース
taint と toleration は以下のような実務シナリオで活用されます。
| ユースケース | taint の設定例 | 狙い |
|---|---|---|
| GPU 専用ノード | gpu=true:NoSchedule | GPU を必要としない Pod が GPU ノードを占有するのを防ぐ |
| ノードメンテナンス前の新規 Pod 受け入れ停止 | maintenance=true:NoSchedule | drain より先に新規 Pod の流入を止める |
| 障害ノードからの既存 Pod 退避 | dedicated=down:NoExecute | 障害ノードの Pod を全て別ノードへ移動させる |
| 特定チーム専用ノード | team=frontend:NoSchedule | マルチテナント環境でノードを用途別に分離する |
| Spot/Preemptible インスタンス | cloud.google.com/gke-spot=true:NoSchedule | Spot インスタンスに耐障害性のある Pod のみを配置する |
実務では taint のキーにドメイン名プレフィックス(例: company.io/dedicated)を付けることが推奨されています。プレフィックスなしのキーはシステム予約の可能性があるためです。ただし CKA 試験では簡潔な形式(dedicated=heavy:NoSchedule)で出題されます。
nodeSelector と nodeAffinity — 配置条件の指定方法を使い分ける
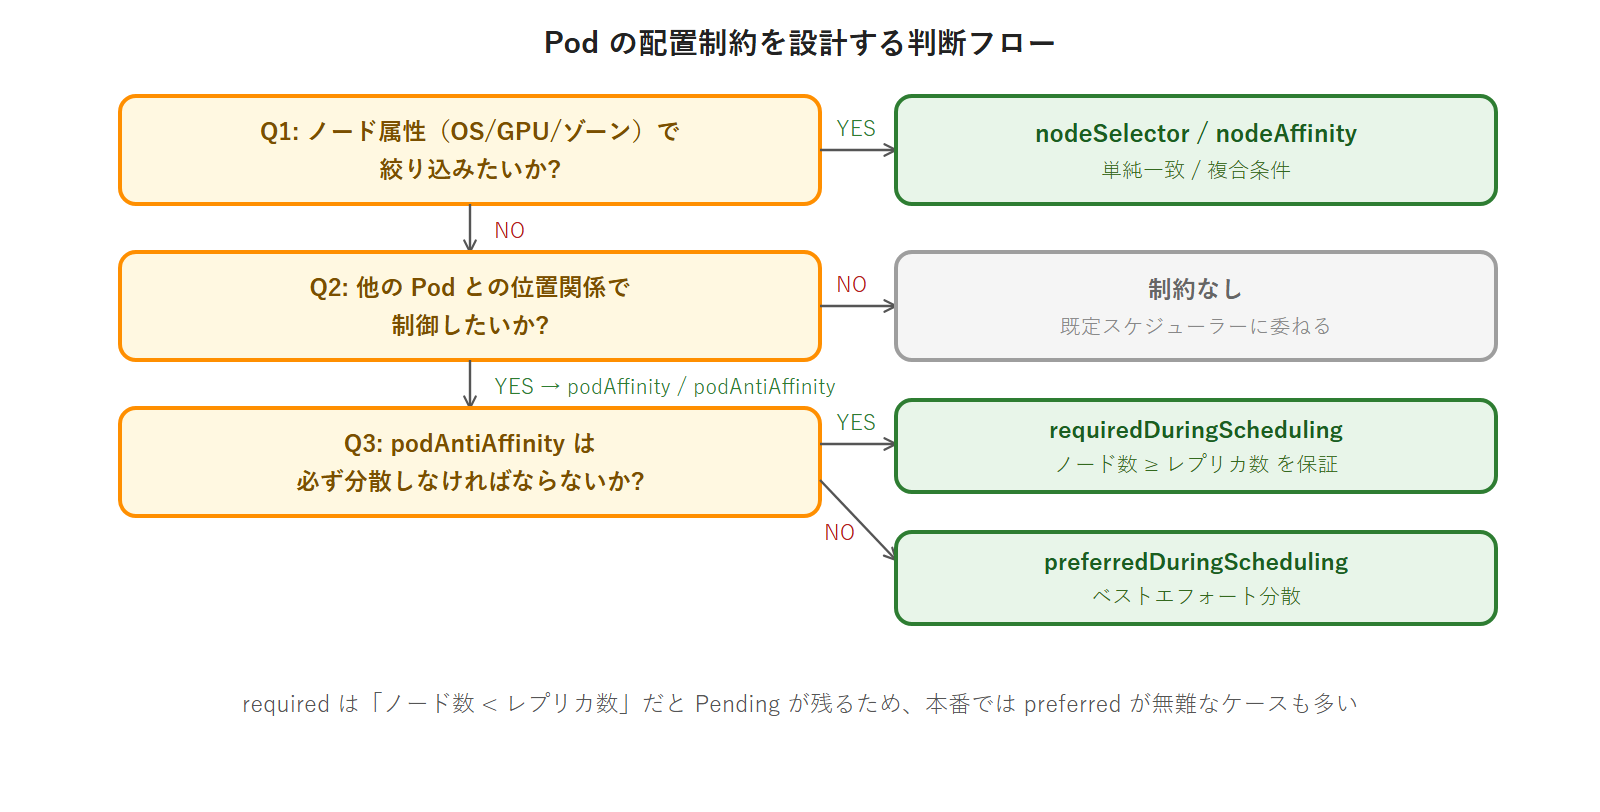
Pod を「特定のノードに配置したい」という要件を満たす方法として、Kubernetes には nodeSelector と nodeAffinity の 2 つがあります。どちらも「ノードのラベルを基準に配置先を選択する」という点は共通ですが、表現力と強制度に差があります。
nodeSelector vs nodeAffinity 比較
| 機能 | nodeSelector | nodeAffinity |
|---|---|---|
| 記述のシンプルさ | 高い(キーバリュー一致のみ) | やや複雑 |
| 使用できる演算子 | = のみ(完全一致) | In / NotIn / Exists / DoesNotExist / Gt / Lt |
| 強制 / 優先の使い分け | 常に強制(ハード) | required(ハード)/ preferred(ソフト) |
| 複数条件の AND | ○(複数フィールドを列挙) | ○(matchExpressions) |
| CKA 試験での重要度 | 頻出 | 頻出 |
シンプルな「このホスト名のノードに配置したい」という要件なら nodeSelector、「OS が linux かつ hostname が wl-01 または wl-02 のいずれかに配置したい」「GPU ノードを優先するが他のノードでも可」という柔軟な要件なら nodeAffinity を選びます。
標準 Node ラベルの確認
nodeSelector や nodeAffinity を書くためには、ノードにどのようなラベルが付いているかを把握する必要があります。
実行コマンド:
$ kubectl get nodes --show-labelskubeadm でインストールした K8s v1.35 クラスタには以下の標準ラベルが自動付与されます。
| ラベルキー | 値の例 | 意味 |
|---|---|---|
kubernetes.io/hostname | k8s-wl-01 | ノードのホスト名 |
kubernetes.io/arch | amd64 | CPU アーキテクチャ |
kubernetes.io/os | linux | OS 種別 |
node-role.kubernetes.io/control-plane | (値なし) | CP ノードのみ存在するラベル |
nodeSelector のマニフェスト例
kubernetes.io/hostname: k8s-wl-01 を持つノードにのみ配置する Pod の完全なマニフェストです。
apiVersion: v1
kind: Pod
metadata:
  name: selector-pod
  namespace: sched-demo
spec:
  nodeSelector:
    kubernetes.io/hostname: k8s-wl-01
  containers:
  - name: nginx
    image: 192.168.1.123:5000/nginx:1.27
nodeSelector は記述がシンプルで直感的ですが、「完全一致のみ」という制約があります。「2 つのノードのどちらかに配置したい」「このラベルが存在しないノードに配置したい」「値が数値で大小比較したい」といった要件には対応できません。これらの要件には次に説明する nodeAffinity を使います。
既存の Pod に nodeSelector を追加する場合、Pod は再作成が必要です(Deployment であれば kubectl rollout restart deployment/<name>)。spec に書く nodeSelector の変更は稼働中の Pod には反映されません。
nodeAffinity のマニフェスト例(required / preferred 両方)
requiredDuringSchedulingIgnoredDuringExecution(ハード制約・条件を満たすノードがなければ Pending):
apiVersion: v1
kind: Pod
metadata:
  name: affinity-required-pod
  namespace: sched-demo
spec:
  affinity:
    nodeAffinity:
      requiredDuringSchedulingIgnoredDuringExecution:
        nodeSelectorTerms:
        - matchExpressions:
          - key: kubernetes.io/os
            operator: In
            values:
            - linux
  containers:
  - name: nginx
image: 192.168.1.123:5000/nginx:1.27preferredDuringSchedulingIgnoredDuringExecution(ソフト制約・条件を満たせなければ他のノードに配置):
apiVersion: v1
kind: Pod
metadata:
  name: affinity-preferred-pod
  namespace: sched-demo
spec:
  affinity:
    nodeAffinity:
      preferredDuringSchedulingIgnoredDuringExecution:
      - weight: 1
        preference:
          matchExpressions:
          - key: kubernetes.io/hostname
            operator: In
            values:
            - k8s-wl-02
  containers:
  - name: nginx
    image: 192.168.1.123:5000/nginx:1.27
preferredDuringSchedulingIgnoredDuringExecution の weight フィールドは 1〜100 の整数で指定します。複数の preferred 条件を設定した場合、スケジューラーは各条件を満たすノードのスコアに weight を加算し、合計スコアが最も高いノードを選びます。
preferredDuringSchedulingIgnoredDuringExecution:
- weight: 100
  preference:
    matchExpressions:
    - key: kubernetes.io/hostname
      operator: In
      values:
      - k8s-wl-02
- weight: 50
  preference:
    matchExpressions:
    - key: kubernetes.io/arch
      operator: In
      values:
      - amd64
上記の例では「k8s-wl-02 に配置できれば weight 100 のボーナス、amd64 ノードに配置できれば weight 50 のボーナス」というスコアリングになります。両方を満たすノードが最優先されます。
operator 一覧
| operator | 意味 | values の要件 | 使用範囲 |
|---|---|---|---|
In | 値がリストに含まれる | 非空リスト | nodeAffinity / podAffinity |
NotIn | 値がリストに含まれない | 非空リスト | nodeAffinity / podAffinity |
Exists | キーが存在する(値問わず) | values フィールドを書かない | nodeAffinity / podAffinity |
DoesNotExist | キーが存在しない | values フィールドを書かない | nodeAffinity / podAffinity |
Gt | 値が整数より大きい | 整数 1 要素 | nodeAffinity のみ |
Lt | 値が整数より小さい | 整数 1 要素 | nodeAffinity のみ |
試験頻出の注意点: Gt と Lt は nodeAffinity 専用の operator です。podAffinity には使えません。CKA 試験では「podAffinity の matchExpressions で Gt を使え」という誤った設問は出ませんが、正しい使用範囲を知っておくことで理解度チェック問題や試験の引っかけに対応できます。
「IgnoredDuringExecution」の意味: requiredDuringSchedulingIgnoredDuringExecution の後半「IgnoredDuringExecution」は「スケジュール後にノードラベルが変わっても Pod を退避しない」という意味です。将来実装予定の RequiredDuringExecution では、スケジュール後もラベル変更に追従して Pod を退避する予定ですが、2026 年時点では未実装です。CKA 試験ではこの長いフィールド名をそのまま書く練習が必要です。テキストエディタ補完が使える CKA 試験環境では affinity: と入力して k8s 公式ドキュメントからコピーする手順が有効です。
nodeAffinity の複合条件 — nodeSelectorTerms と matchExpressions の AND/OR
nodeAffinity の条件指定には AND 条件と OR 条件を組み合わせられます。理解しておくべき構造を整理します。
- nodeSelectorTerms の要素同士は OR: 複数の
nodeSelectorTermsを列挙した場合、いずれか 1 つを満たせばよい - 1 つの nodeSelectorTerms 内の matchExpressions 同士は AND: 1 つの term 内に複数の matchExpressions を書いた場合、すべてを満たす必要がある
nodeSelectorTerms:
- matchExpressions:
  - key: kubernetes.io/os
    operator: In
    values:
    - linux
  - key: kubernetes.io/arch
    operator: In
    values:
    - amd64
- matchExpressions:
  - key: kubernetes.io/hostname
    operator: In
    values:
    - k8s-wl-02
上記は「(linux かつ amd64 のノード)OR(hostname が k8s-wl-02 のノード)」という条件になります。CKA 試験では単純な 1 条件が出題される傾向がありますが、マニフェスト全体の構造を把握しておくと応用が利きます。
nodeAffinity の実務ユースケース
nodeAffinity は以下のような場面で活用されます。
| ユースケース | 条件設定例 | 狙い |
|---|---|---|
| GPU ノードへの配置 | key: gpu, operator: Exists | GPU ラベルが付いたノードにのみ配置 |
| 特定 AZ への優先配置 | key: topology.kubernetes.io/zone, operator: In, values: [ap-northeast-1a] | 特定 AZ を優先しつつ他 AZ でも可(preferred) |
| 大容量メモリノードへの必須配置 | key: node.company.io/memory, operator: Gt, values: [64](64GB 超) | メモリ集約型ワークロードを大容量ノードに限定 |
| 特定バージョンの OS のみ許可 | key: kubernetes.io/os, operator: NotIn, values: [windows] | Linux 専用コンテナを Windows ノードに乗せない |
podAffinity と podAntiAffinity — Pod 間の「近くに置く / 離して置く」制御
nodeAffinity は「ノードのラベル」を基準に配置先を選びましたが、podAffinity / podAntiAffinity は「他の Pod の存在」を基準に配置先を選びます。「このラベルを持つ Pod と同じノードに置きたい(podAffinity)」「このラベルを持つ Pod とは別のノードに置きたい(podAntiAffinity)」という制御が可能です。
【podAntiAffinity の動作 — topologyKey: kubernetes.io/hostname】

期待: test-app の 2 レプリカを別々のノードに配置したい

Pod A(test-app-xxxx)   →  k8s-wl-01 に配置
Pod B(test-app-yyyy)   →  k8s-wl-02 に配置(k8s-wl-01 を避ける)

topologyKey: kubernetes.io/hostname
= 「同じ hostname ラベルを持つノード(= 同じノード)には
   同じ app=test-app Pod を配置しない」
nodeAffinity との違い
| 比較軸 | nodeAffinity | podAffinity / podAntiAffinity |
|---|---|---|
| 基準 | ノードのラベル | 他の Pod の存在 |
| 使い方 | 「このラベルを持つノードに配置したい」 | 「このラベルを持つ Pod と同じ / 別のトポロジーに配置したい」 |
| 典型ユースケース | GPU ノード指定・OS 指定・ゾーン限定 | 冗長性確保(分散)・高速通信(同一ノード) |
topologyKey の種類と使いどころ
| topologyKey | 意味 | 典型ユースケース |
|---|---|---|
kubernetes.io/hostname | 同一ノード(ホスト単位) | レプリカを別ノードに分散(本回演習) |
topology.kubernetes.io/zone | 同一 AZ(可用性ゾーン) | マルチ AZ 環境での分散配置 |
topology.kubernetes.io/region | 同一リージョン | マルチリージョン環境 |
podAntiAffinity のマニフェスト例(完全版)
Deployment の 2 レプリカを必ず別ノードに配置する設定です。
apiVersion: apps/v1
kind: Deployment
metadata:
  name: test-app
  namespace: sched-demo
spec:
  replicas: 2
  selector:
    matchLabels:
      app: test-app
  template:
    metadata:
      labels:
        app: test-app
    spec:
      affinity:
        podAntiAffinity:
          requiredDuringSchedulingIgnoredDuringExecution:
          - labelSelector:
              matchLabels:
                app: test-app
            topologyKey: kubernetes.io/hostname
      containers:
      - name: nginx
        image: 192.168.1.123:5000/nginx:1.27
        ports:
        - containerPort: 80
required vs preferred の選択基準
| 選択 | 適用場面 | リスク |
|---|---|---|
requiredDuringScheduling | 必ず分散させたい(可用性が最優先) | ノード数 < レプリカ数だと Pod が Pending になる |
preferredDuringScheduling | できれば分散させたい(Pending を避けたい) | 条件が満たせない場合は同一ノードに配置される |
本番ガードレール — podAntiAffinity 過剰で全 Pod が Pending になるパターン: requiredDuringScheduling の podAntiAffinity を設定した場合、「レプリカ数 > Workload Node 数」になると残りの Pod がどのノードにも配置できなくなり Pending が発生します。本回演習(2 レプリカ・2 Workload Node)では問題ありませんが、将来レプリカ数を 3 以上に増やす際は注意が必要です。kubectl describe pod の Events に 0/2 nodes are available: 2 node(s) didn't match pod anti-affinity rules と表示されます。これは第8回の HPA(Horizontal Pod Autoscaler)設定時にも意識すべき制約です。
podAffinity — 同一ノードへの「引き寄せ」
podAntiAffinity が「離して置く」制御であるのに対し、podAffinity は「近くに置く」制御です。主なユースケースは通信レイテンシを最小化したいコンポーネント同士を同一ノードに配置する場面です。
例えば、アプリケーションのサイドカーコンテナ(ロギングエージェント等)を Pod 内ではなく別の Pod として展開する場合、同一ノードへの配置で UNIX ドメインソケットによる通信が可能になります。
spec:
  affinity:
    podAffinity:
      requiredDuringSchedulingIgnoredDuringExecution:
      - labelSelector:
          matchLabels:
            app: cache-server
        topologyKey: kubernetes.io/hostname
上記の設定を持つ Pod は「app=cache-server ラベルを持つ Pod と同じノードにのみ配置される」という制約を持ちます。cache-server Pod が存在しないノードには配置されません。
ただし podAffinity の使用は慎重に検討してください。「同一ノードに集めたい Pod が存在しないノードには配置できない」という制約が予期しない Pending の原因になります。podAffinity を大量に使用すると、スケジューラーの計算負荷が増大します(podAntiAffinity も同様)。これはクラスタ規模が大きくなるほど顕著になります。
podAffinity / podAntiAffinity の実務判断フロー
PriorityClass と preemption — 重要 Pod を優先スケジューリングする
クラスタのリソースが枯渇に近づいたとき、「どの Pod を先にスケジュールするか / どの Pod を退避するか」の優先順位を定義する仕組みが PriorityClass です。優先順位がなければ、業務に不可欠な Pod が後回しになり、バッチ処理 Pod が先にリソースを確保してしまうケースが生じます。
PriorityClass のフィールド解説
| フィールド | 意味 |
|---|---|
value | 優先度の数値(大きいほど高優先)。0〜1,000,000,000 の範囲が推奨(それ以上はシステム予約) |
globalDefault | true の場合、priorityClassName を指定しない全 Pod にデフォルト適用。1 つのクラスタで 1 つだけ true にできる |
preemptionPolicy | PreemptLowerPriority(デフォルト)で低優先度 Pod を退避 / Never で退避せず待機 |
description | この PriorityClass の用途説明文 |
ビルトイン PriorityClass の確認
kubeadm でインストールしたクラスタには 2 種類の PriorityClass が自動作成されています。
実行コマンド:
$ kubectl get priorityclass実行結果:
NAME                      VALUE        GLOBAL-DEFAULT   AGE
system-cluster-critical   2000000000   false            10d
system-node-critical      2000001000   false            10d
system-cluster-critical は kube-dns などのクラスタ重要コンポーネントに使われ、system-node-critical はノードレベルの重要コンポーネント(kube-proxy 等)に使われます。両方とも 20 億前後の高い value を持ち、ユーザーが作成する PriorityClass が誤って上書きできない設計になっています。
ユーザーが作成する PriorityClass の value は 1,000,000,000(10 億)以下にする必要があります。それ以上の値はシステム予約です。システム予約 value を設定しようとすると以下のエラーが返ります。
The PriorityClass "my-priority" is invalid: value: Forbidden: maximum allowed value of a user defined priority is 1000000000preemption の仕組み(概念図)

preemption の重要なポイントは「高優先度 Pod がスケジュール不可になったとき」にのみ発動することです。リソースに余裕があれば、低優先度 Pod はそのまま稼働し続けます。退避された低優先度 Pod は、他にリソースのあるノードがあれば再スケジュールされます。
PriorityClass のマニフェスト例(2 種)
高優先度クラス(ミッションクリティカル用):
apiVersion: scheduling.k8s.io/v1
kind: PriorityClass
metadata:
  name: high-priority
value: 1000000
globalDefault: false
description: "ミッションクリティカルな Pod 用高優先度クラス"
preemptionPolicy: PreemptLowerPriority
低優先度クラス(バッチ処理・バックグラウンド用):
apiVersion: scheduling.k8s.io/v1
kind: PriorityClass
metadata:
  name: low-priority
value: 1000
globalDefault: false
description: "バッチ処理・バックグラウンド処理用低優先度クラス"
preemptionPolicy: PreemptLowerPriority
Pod への適用(priorityClassName フィールド)
priorityClassName は spec 直下(containers と同レベル)に書きます。
spec:
  priorityClassName: high-priority
  containers:
  - name: nginx
    image: 192.168.1.123:5000/nginx:1.27
PriorityClass は Cluster スコープのリソースです。Namespace に属しません。このため、sched-demo Namespace を削除しても PriorityClass は残存します。演習後は別途 kubectl delete priorityclass で削除する必要があります(やってみよう③ で実施)。
PriorityClass の設計ガイドライン
実際の本番クラスタで PriorityClass を設計する際の指針を整理します。
| クラス名の例 | value の範囲 | 対象 Pod の例 |
|---|---|---|
mission-critical | 1,000,000 | 決済処理・認証基盤など SLA 最優先のサービス |
production | 100,000 | 本番 API サービス・フロントエンド |
staging | 10,000 | ステージング環境 |
batch | 1,000 | バッチ処理・定期ジョブ・レポート生成 |
dev | 100 | 開発環境・テスト用途 |
value の数値設計には「後から間に値を入れられる余地を残す」ことが重要です。1・2・3 のように連番にすると後から優先度クラスを追加できなくなります。100・1,000・10,000 のように桁を分けておくと柔軟性が高まります。
globalDefault: true の PriorityClass はクラスタに 1 つだけ設定できます。これを設定すると、priorityClassName を指定しない Pod がすべてこの優先度クラスを継承します。既存クラスタに追加する場合は、既存 Pod の priority 値が変わる影響を確認してから設定してください。
Kubernetes スケジューラーの動作全体像
本回で学んだ 5 つの機構(taint/toleration・nodeSelector・nodeAffinity・podAntiAffinity・PriorityClass)は、Kubernetes スケジューラーが「どのノードに Pod を配置するか」を決定する際のフィルタリングとスコアリングの各フェーズで動作します。
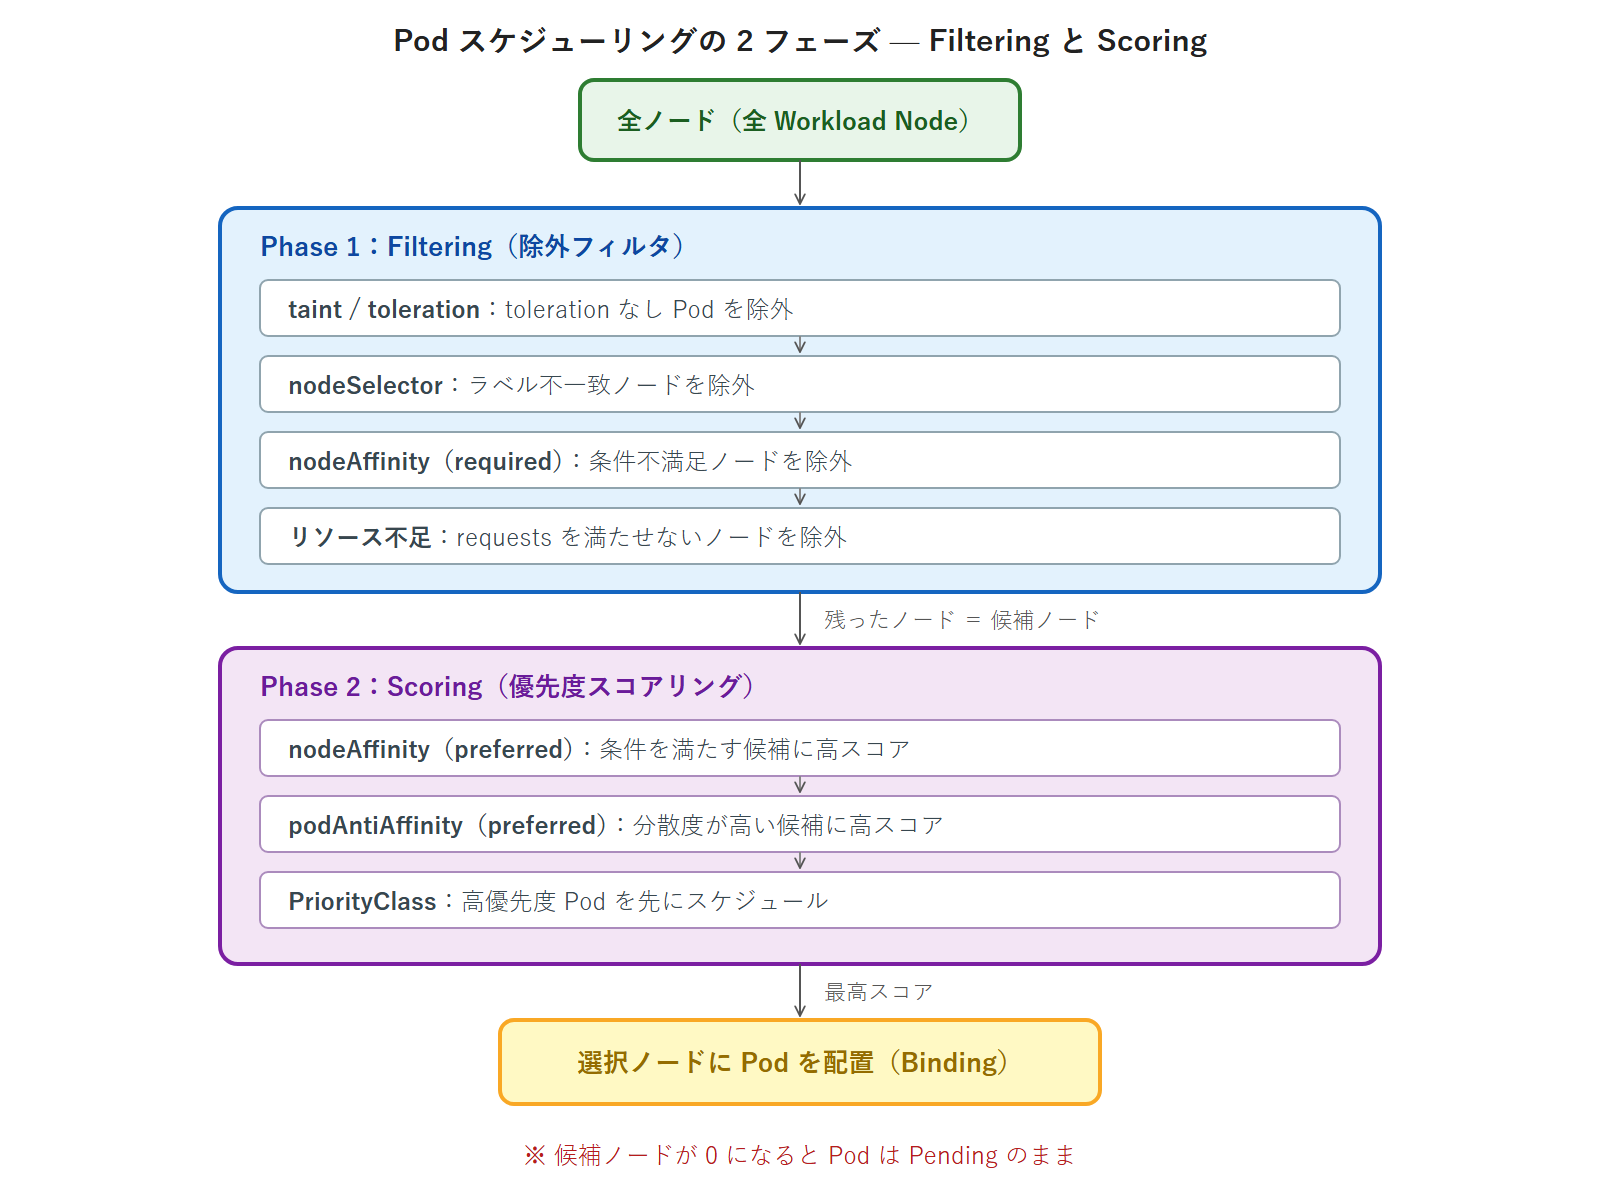
Filtering フェーズで候補ノードが 0 になると Pod は Pending になります。kubectl describe pod の Events には「0/5 nodes are available:」で始まるメッセージが表示され、各除外理由の数が示されます。このメッセージの読み取り方は第6回のトラブルシュート演習でも扱いましたが、本回で学んだ機構と対応づけることでより深く理解できます。
やってみよう①: taint と toleration — 専用ノードを作って確認する
作業場所: k8s-ops(kubectl 操作・developer ユーザー)
演習シナリオ:
① sched-demo Namespace 作成
② k8s-wl-02 に NoSchedule taint を付与
③ toleration なし Pod を作成 → k8s-wl-02 に配置されないことを確認
④ toleration あり Pod を作成 → k8s-wl-02 に配置されることを確認
⑤ NoExecute taint に変更して稼働中 Pod が evict されることを確認
⑥ taint を削除(クリーンアップ)
演習開始前の確認: CP ノードの taint を確認して演習環境を把握します。
実行コマンド:
$ kubectl describe node k8s-cp-01 | grep Taints実行結果:
Taints: node-role.kubernetes.io/control-plane:NoScheduleStep 1: sched-demo Namespace 作成
実行コマンド:
$ kubectl create namespace sched-demo実行結果:
namespace/sched-demo createdStep 2: k8s-wl-02 に NoSchedule taint を付与
実行コマンド:
$ kubectl taint nodes k8s-wl-02 dedicated=heavy:NoSchedule実行結果:
node/k8s-wl-02 taintedtaint が設定されたことを確認します。
実行コマンド:
$ kubectl describe node k8s-wl-02 | grep Taints実行結果:
Taints: dedicated=heavy:NoScheduleStep 3: toleration なし Pod を作成(k8s-wl-02 に配置されないことを確認)
以下の内容で no-toleration-pod.yaml を作成します。
apiVersion: v1
kind: Pod
metadata:
  name: no-toleration-pod
  namespace: sched-demo
spec:
  containers:
  - name: nginx
    image: 192.168.1.123:5000/nginx:1.27
実行コマンド:
$ kubectl apply -f no-toleration-pod.yaml実行結果:
pod/no-toleration-pod created配置先を確認します。k8s-wl-01 に配置されているはずです(k8s-wl-02 は NoSchedule taint があるため回避されます)。
実行コマンド:
$ kubectl get pod no-toleration-pod -n sched-demo -o wide実行結果(NODE が k8s-wl-01 であることを確認):
NAME                READY   STATUS    RESTARTS   AGE   IP            NODE        NOMINATED NODE   READINESS GATES
no-toleration-pod   1/1     Running   0          10s   10.0.x.x      k8s-wl-01   <none>           <none>
Step 4: toleration あり Pod を作成(k8s-wl-02 に配置されることを確認)
以下の内容で with-toleration-pod.yaml を作成します。toleration で dedicated=heavy:NoSchedule を許容します。
apiVersion: v1
kind: Pod
metadata:
  name: with-toleration-pod
  namespace: sched-demo
spec:
  tolerations:
  - key: "dedicated"
    operator: "Equal"
    value: "heavy"
    effect: "NoSchedule"
  containers:
  - name: nginx
    image: 192.168.1.123:5000/nginx:1.27
実行コマンド:
$ kubectl apply -f with-toleration-pod.yaml実行結果:
pod/with-toleration-pod created配置先を確認します。toleration を付けたことで k8s-wl-02 も配置候補に入ります(ただし toleration は taint の許容のみで配置先を強制しないため、scheduler が k8s-wl-01 を選ぶこともあります。確実に wl-02 へ固定するには nodeName や nodeSelector を併用します)。
実行コマンド:
$ kubectl get pod with-toleration-pod -n sched-demo -o wide実行結果(wl-02 が配置候補に入った例。scheduler の選択で wl-01 になる場合もあります):
NAME                   READY   STATUS    RESTARTS   AGE   IP            NODE        NOMINATED NODE   READINESS GATES
with-toleration-pod    1/1     Running   0          8s    10.0.x.x      k8s-wl-02   <none>           <none>
2 つの Pod の配置先が意図通りに分かれたことを確認できました。no-toleration-pod は NoSchedule taint を持つ k8s-wl-02 を回避して k8s-wl-01 に配置され、with-toleration-pod は toleration により k8s-wl-02 への配置が許可されます(確実に wl-02 へ固定したい場合は nodeName / nodeSelector を併用します)。
Step 5: NoExecute taint に変更して稼働中 Pod が evict されることを確認
NoExecute taint は「新規 Pod の配置を拒否する」だけでなく「すでに稼働中の Pod も退避する」唯一の effect です。この動作を実機で確認します。まず既存の NoSchedule taint を削除し、NoExecute taint を付与します。
実行コマンド(NoSchedule taint を削除):
$ kubectl taint nodes k8s-wl-02 dedicated=heavy:NoSchedule-実行結果:
node/k8s-wl-02 untainted実行コマンド(NoExecute taint を付与):
$ kubectl taint nodes k8s-wl-02 dedicated=heavy:NoExecute実行結果:
node/k8s-wl-02 taintedk8s-wl-02 で稼働していた with-toleration-pod が evict されているか確認します。
実行コマンド:
$ kubectl get pods -n sched-demo -o wide実行結果(with-toleration-pod が Pending または Terminating になっていることを確認):
NAME                   READY   STATUS    RESTARTS   AGE   NODE
no-toleration-pod      1/1     Running   0          60s   k8s-wl-01
with-toleration-pod 0/1 Pending 0 5s <none>この動作の理由を解説します。with-toleration-pod の toleration は effect: "NoSchedule" のみを指定していました。NoExecute taint が付与されたとき、スケジューラーは「この Pod の toleration は NoExecute を許容していない」と判断し、Pod を evict します。effect は完全一致で評価されます。NoExecute taint に対応するには toleration の effect フィールドも "NoExecute" に変更する必要があります。
Step 6: taint を削除(クリーンアップ)
実行コマンド(NoExecute taint を削除):
$ kubectl taint nodes k8s-wl-02 dedicated=heavy:NoExecute-実行結果:
node/k8s-wl-02 untaintedtaint が消えたことを確認します。
実行コマンド:
$ kubectl describe node k8s-wl-02 | grep Taints実行結果(Taints がなしになっていることを確認):
Taints: <none>演習①の taint はクリーンアップできました。sched-demo Namespace 内の Pod(no-toleration-pod・with-toleration-pod)は演習③のクリーンアップ時に Namespace ごと削除します。
演習①の振り返り — 確認できたこと
演習①で確認できた動作をまとめます。
- NoSchedule taint の動作: k8s-wl-02 に
dedicated=heavy:NoScheduleを付与した後、toleration なし Pod(no-toleration-pod)は k8s-wl-02 を回避して k8s-wl-01 に配置された。toleration あり Pod(with-toleration-pod)は k8s-wl-02 への配置が許可された - NoExecute taint の既存 Pod への影響: NoSchedule から NoExecute に変更した瞬間、k8s-wl-02 で稼働していた
with-toleration-pod(toleration が NoSchedule のみで NoExecute を許容していなかった)が evict された。effect は完全一致で評価される(例外: toleration のeffectフィールドを空文字にした場合は、その key のすべての effect を許容する) - taint 削除の書式: 末尾の
-を付けることで taint を削除できる。kubectl describe nodeの Taints フィールドが<none>になることを確認した
CKA 試験では「指定した taint を持つノードに Pod を配置するための toleration を書け」という形式で出題されます。toleration の記法(key・operator・value・effect の 4 フィールド)を正確に書けるよう練習してください。
やってみよう②: podAntiAffinity で 2 レプリカを別ノードに分散配置する
作業場所: k8s-ops(kubectl 操作・developer ユーザー)
本演習では最初に nodeSelector と nodeAffinity の動作を簡単に確認し、次に podAntiAffinity の本演習に進みます。
演習シナリオ:
0. nodeSelector で k8s-wl-01 に Pod を配置する(nodeSelector 確認)
0b. nodeAffinity(preferred)で k8s-wl-02 を優先する Pod を作成する
① podAntiAffinity なし Deployment を作成(2 レプリカが同一ノードに集中しうることを確認)
② podAntiAffinity あり Deployment を作成(2 レプリカが別ノードに分散することを確認)
③ レプリカを 3 に増やして Pending が発生することを確認(over-provision のリスク体験)
④ レプリカを 2 に戻す
Step 0: nodeSelector で特定ノードに Pod を配置する
まず nodeSelector の動作確認を行います。以下の内容で selector-pod.yaml を作成します。
apiVersion: v1
kind: Pod
metadata:
  name: selector-pod
  namespace: sched-demo
spec:
  nodeSelector:
    kubernetes.io/hostname: k8s-wl-01
  containers:
  - name: nginx
    image: 192.168.1.123:5000/nginx:1.27
実行コマンド:
$ kubectl apply -f selector-pod.yaml実行結果:
pod/selector-pod created実行コマンド(k8s-wl-01 に配置されることを確認):
$ kubectl get pod selector-pod -n sched-demo -o wide実行結果:
NAME           READY   STATUS    RESTARTS   AGE   IP          NODE        NOMINATED NODE   READINESS GATES
selector-pod   1/1     Running   0          8s    10.0.x.x    k8s-wl-01   <none>           <none>
nodeSelector: kubernetes.io/hostname: k8s-wl-01 により、Pod が確実に k8s-wl-01 に配置されました。
Step 0b: nodeAffinity(preferred)で k8s-wl-02 を優先配置する
次に nodeAffinity の preferred(ソフト制約)の動作を確認します。以下の内容で affinity-preferred-pod.yaml を作成します。
apiVersion: v1
kind: Pod
metadata:
  name: affinity-preferred-pod
  namespace: sched-demo
spec:
  affinity:
    nodeAffinity:
      preferredDuringSchedulingIgnoredDuringExecution:
      - weight: 100
        preference:
          matchExpressions:
          - key: kubernetes.io/hostname
            operator: In
            values:
            - k8s-wl-02
  containers:
  - name: nginx
    image: 192.168.1.123:5000/nginx:1.27
実行コマンド:
$ kubectl apply -f affinity-preferred-pod.yaml実行結果:
pod/affinity-preferred-pod created実行コマンド(k8s-wl-02 に優先配置されることを確認):
$ kubectl get pod affinity-preferred-pod -n sched-demo -o wide実行結果(k8s-wl-02 に配置されていることを確認):
NAME                    READY   STATUS    RESTARTS   AGE   IP          NODE        NOMINATED NODE   READINESS GATES
affinity-preferred-pod  1/1     Running   0          10s   10.0.x.x    k8s-wl-02   <none>           <none>
preferred の nodeAffinity により k8s-wl-02 に配置されました。nodeSelector との違いは「k8s-wl-02 が使えない状況(SchedulingDisabled 等)でも他のノードに配置できる」点です。
Step 1: podAntiAffinity なし Deployment(比較用)
まず affinity を設定しない Deployment を作成し、レプリカが同一ノードに集中する可能性を観察します。以下の内容で test-app-no-anti.yaml を作成します。
apiVersion: apps/v1
kind: Deployment
metadata:
  name: test-app-no-anti
  namespace: sched-demo
spec:
  replicas: 2
  selector:
    matchLabels:
      app: test-app-no-anti
  template:
    metadata:
      labels:
        app: test-app-no-anti
    spec:
      containers:
      - name: nginx
        image: 192.168.1.123:5000/nginx:1.27
        ports:
        - containerPort: 80
実行コマンド:
$ kubectl apply -f test-app-no-anti.yaml実行結果:
deployment.apps/test-app-no-anti created配置先を確認します。スケジューラーのデフォルト動作では、両 Pod が同一ノードに配置される可能性があります。
実行コマンド:
$ kubectl get pods -n sched-demo -l app=test-app-no-anti -o wide実行結果(例:両方が k8s-wl-01 に配置されたケース):
NAME                                READY   STATUS    RESTARTS   AGE   NODE
test-app-no-anti-6d8b9c-aaaaa       1/1     Running   0          8s    k8s-wl-01
test-app-no-anti-6d8b9c-bbbbb       1/1     Running   0          8s    k8s-wl-01
実際の配置先は演習時のスケジューラーの判断によって異なりますが、affinity を設定しない場合はノードへの集中を防ぐ仕組みがないことが確認できます。
Step 2: podAntiAffinity あり Deployment の作成
以下の内容で test-app.yaml を作成します。requiredDuringSchedulingIgnoredDuringExecution + topologyKey: kubernetes.io/hostname の組み合わせで「同一 hostname ノードには同じ app=test-app ラベルの Pod を配置しない」という制約を設定します。
apiVersion: apps/v1
kind: Deployment
metadata:
  name: test-app
  namespace: sched-demo
spec:
  replicas: 2
  selector:
    matchLabels:
      app: test-app
  template:
    metadata:
      labels:
        app: test-app
    spec:
      affinity:
        podAntiAffinity:
          requiredDuringSchedulingIgnoredDuringExecution:
          - labelSelector:
              matchLabels:
                app: test-app
            topologyKey: kubernetes.io/hostname
      containers:
      - name: nginx
        image: 192.168.1.123:5000/nginx:1.27
        ports:
        - containerPort: 80
実行コマンド:
$ kubectl apply -f test-app.yaml実行結果:
deployment.apps/test-app created配置先を確認します。2 Pod が別々のノードに配置されているはずです。
実行コマンド:
$ kubectl get pods -n sched-demo -l app=test-app -o wide実行結果(2 Pod が k8s-wl-01 と k8s-wl-02 に分散配置されていることを確認):
NAME                       READY   STATUS    RESTARTS   AGE   NODE
test-app-5f7d9c-ccccc      1/1     Running   0          10s   k8s-wl-01
test-app-5f7d9c-ddddd      1/1     Running   0          10s   k8s-wl-02
podAntiAffinity により、2 つの Pod が k8s-wl-01 と k8s-wl-02 に分散配置されました。片方のノードに障害が発生しても、もう一方のノードで Pod が継続稼働する可用性が確保されています。
Step 3: レプリカを 3 に増やして Pending が発生することを確認
podAntiAffinity(required)の制約下でレプリカ数をノード数(2)を超える 3 に増やし、3 Pod 目が Pending になることを実機で確認します。
実行コマンド:
$ kubectl scale deployment test-app -n sched-demo --replicas=3実行結果:
deployment.apps/test-app scaled実行コマンド(3 Pod 目が Pending になることを確認):
$ kubectl get pods -n sched-demo -l app=test-app -o wide実行結果(3 Pod 目が Pending のまま):
NAME                       READY   STATUS    RESTARTS   AGE   NODE
test-app-5f7d9c-ccccc      1/1     Running   0          90s   k8s-wl-01
test-app-5f7d9c-ddddd      1/1     Running   0          90s   k8s-wl-02
test-app-5f7d9c-eeeee      0/1     Pending   0          5s    <none>
3 Pod 目の Pending 原因を確認します。
実行コマンド:
$ kubectl describe pod test-app-5f7d9c-eeeee -n sched-demo実行結果(Events セクションに anti-affinity 違反メッセージが表示される):
Events:
  Type     Reason            Age   From               Message
  ----     ------            ----  ----               -------
  Warning  FailedScheduling  10s   default-scheduler  0/5 nodes are available: 2 node(s) didn't match pod anti-affinity rules, 3 node(s) had untolerated taint {node-role.kubernetes.io/control-plane: }. preemption: 0/5 nodes are available: 2 Preemption is not helpful for scheduling, 3 Insufficient node anti-affinity.
「2 node(s) didn’t match pod anti-affinity rules」というメッセージが表示されます。2 台の Workload Node はすでに test-app Pod が 1 つずつ配置されており、anti-affinity ルールにより 3 Pod 目を配置できるノードがない状態です。CP ノード 3 台は node-role.kubernetes.io/control-plane:NoSchedule taint があるため除外されています。
Step 4: レプリカを 2 に戻す
実行コマンド:
$ kubectl scale deployment test-app -n sched-demo --replicas=2実行結果:
deployment.apps/test-app scaledPending Pod が削除され、2 Pod が正常稼働していることを確認します。
実行コマンド:
$ kubectl get pods -n sched-demo -l app=test-app -o wide実行結果:
NAME                       READY   STATUS    RESTARTS   AGE   NODE
test-app-5f7d9c-ccccc      1/1     Running   0          2m    k8s-wl-01
test-app-5f7d9c-ddddd      1/1     Running   0          2m    k8s-wl-02
演習②の振り返り — 確認できたこと
演習②で確認できた動作をまとめます。
- podAntiAffinity なし Deployment の挙動: affinity 設定がない場合、スケジューラーはリソースや配置履歴に基づいて配置先を決定するが、分散を保証する仕組みがない。同一ノードへの集中が起こりうる
- podAntiAffinity ありで確実な分散配置:
requiredDuringSchedulingIgnoredDuringExecution+topologyKey: kubernetes.io/hostnameの組み合わせで、2 レプリカが必ず k8s-wl-01 と k8s-wl-02 に分散配置された - レプリカ数オーバーの Pending: ノード数(2)を超えるレプリカ数(3)を設定すると 3 Pod 目が Pending になった。
kubectl describe podの Events にdidn't match pod anti-affinity rulesと表示された - Pending Pod の describe 読み取り: 「0/5 nodes are available: 2 node(s) didn’t match pod anti-affinity rules, 3 node(s) had untolerated taint」というメッセージから「anti-affinity で 2 Workload Node は使えず、CP 3 台は taint で除外」という状況を読み取った
この「describe pod の Events 読み取り」は CKA 試験のトラブルシュート問題で頻出のスキルです。第6回で学んだ切り分けフローと組み合わせ、「Events の内容 → 原因の特定 → 修正方針」の流れを身に付けてください。
やってみよう③: PriorityClass を作って Pod に適用する
作業場所: k8s-ops(kubectl 操作・developer ユーザー)
演習シナリオ:
① 既存の PriorityClass を確認
② high-priority / low-priority の 2 つの PriorityClass を作成
③ 各 PriorityClass を適用した Pod を作成
④ kubectl describe pod で priority フィールドが設定されていることを確認
⑤ sched-demo Namespace を削除してクリーンアップ(PriorityClass は別途削除)
Step 1: 既存 PriorityClass の確認
実行コマンド:
$ kubectl get priorityclass実行結果(kubeadm デフォルトの 2 種が表示される):
NAME                      VALUE        GLOBAL-DEFAULT   AGE
system-cluster-critical   2000000000   false            10d
system-node-critical      2000001000   false            10d
Step 2: PriorityClass の作成
以下の内容で priority-classes.yaml を作成します。高優先度と低優先度の 2 クラスを 1 ファイルで定義します。
apiVersion: scheduling.k8s.io/v1
kind: PriorityClass
metadata:
  name: high-priority
value: 1000000
globalDefault: false
description: "ミッションクリティカルな Pod 用高優先度クラス"
preemptionPolicy: PreemptLowerPriority
---
apiVersion: scheduling.k8s.io/v1
kind: PriorityClass
metadata:
  name: low-priority
value: 1000
globalDefault: false
description: "バッチ処理・バックグラウンド処理用低優先度クラス"
preemptionPolicy: PreemptLowerPriority
実行コマンド:
$ kubectl apply -f priority-classes.yaml実行結果:
priorityclass.scheduling.k8s.io/high-priority created
priorityclass.scheduling.k8s.io/low-priority created
一覧を確認します。
実行コマンド:
$ kubectl get priorityclass実行結果(2 つが追加されたことを確認):
NAME                      VALUE        GLOBAL-DEFAULT   AGE
high-priority             1000000      false            5s
low-priority              1000         false            5s
system-cluster-critical   2000000000   false            10d
system-node-critical      2000001000   false            10d
Step 3: 各 PriorityClass を適用した Pod の作成と確認
以下の内容で priority-pods.yaml を作成します。
apiVersion: v1
kind: Pod
metadata:
  name: high-prio-pod
  namespace: sched-demo
spec:
  priorityClassName: high-priority
  containers:
  - name: nginx
    image: 192.168.1.123:5000/nginx:1.27
---
apiVersion: v1
kind: Pod
metadata:
  name: low-prio-pod
  namespace: sched-demo
spec:
  priorityClassName: low-priority
  containers:
  - name: nginx
    image: 192.168.1.123:5000/nginx:1.27
実行コマンド:
$ kubectl apply -f priority-pods.yaml実行結果:
pod/high-prio-pod created
pod/low-prio-pod created
jsonpath で priority フィールドの数値を確認します。
実行コマンド:
$ kubectl get pod high-prio-pod -n sched-demo -o jsonpath='{.spec.priority}'実行結果:
1000000kubectl describe でも Priority と PriorityClassName が設定されていることを確認します。
実行コマンド:
$ kubectl describe pod high-prio-pod -n sched-demo | grep -E "Priority:|Priority Class Name:"実行結果:
Priority:             1000000
Priority Class Name:  high-priority
low-prio-pod も確認します。
実行コマンド:
$ kubectl describe pod low-prio-pod -n sched-demo | grep -E "Priority:|Priority Class Name:"実行結果:
Priority:             1000
Priority Class Name:  low-priority
PriorityClass が Pod に適用され、Priority フィールドに数値が設定されていることを確認できました。
2 つの Pod の priority を比較確認します。
実行コマンド(sched-demo Namespace 内の全 Pod の priority を一覧表示):
$ kubectl get pods -n sched-demo -o custom-columns='NAME:.metadata.name,PRIORITY:.spec.priority,PRIORITYCLASS:.spec.priorityClassName'実行結果(priority の数値差が一覧で確認できる):
NAME              PRIORITY   PRIORITYCLASS
high-prio-pod     1000000    high-priority
low-prio-pod      1000       low-priority
no-toleration-pod 0          <none>
priorityClassName を指定しなかった no-toleration-pod(演習①で作成)は priority が 0 になっています。globalDefault: true の PriorityClass がない場合、priorityClassName 未指定 Pod の priority は 0 です。
Step 4: sched-demo Namespace 削除(全演習のクリーンアップ)
演習①〜③で作成したすべてのリソースを Namespace ごと削除します。
実行コマンド:
$ kubectl delete namespace sched-demo実行結果:
namespace "sched-demo" deletedPriorityClass は Namespace スコープのリソースではないため、Namespace 削除では消えません。別途削除します。
実行コマンド:
$ kubectl delete priorityclass high-priority low-priority実行結果:
priorityclass.scheduling.k8s.io "high-priority" deleted
priorityclass.scheduling.k8s.io "low-priority" deleted
クリーンアップの完了を確認します。
実行コマンド(namespace 一覧確認):
$ kubectl get namespace sched-demo実行結果:
Error from server (NotFound): namespaces "sched-demo" not found実行コマンド(PriorityClass 一覧確認):
$ kubectl get priorityclass実行結果(system-cluster-critical と system-node-critical のみが残ることを確認):
NAME                      VALUE        GLOBAL-DEFAULT   AGE
system-cluster-critical   2000000000   false            10d
system-node-critical      2000001000   false            10d
演習で作成したすべてのリソースが削除され、クラスタが第7回開始前と同じ状態に戻りました。
演習③の振り返り — 確認できたこと
演習③で確認できた動作をまとめます。
- ビルトイン PriorityClass の確認: kubeadm デフォルトで
system-cluster-critical(value: 2000000000)とsystem-node-critical(value: 2000001000)の 2 種が存在することを確認した - PriorityClass の作成:
apiVersion: scheduling.k8s.io/v1の PriorityClass を YAML マニフェストで作成した。value・globalDefault・preemptionPolicy・descriptionの各フィールドを設定できた - Pod への適用と確認:
spec.priorityClassNameフィールドに PriorityClass 名を指定することで、Pod のPriorityフィールドに数値が設定されることをkubectl describe podとkubectl get pod -o jsonpathで確認した - PriorityClass は Cluster スコープ:
sched-demoNamespace を削除しても PriorityClass は残存した。kubectl delete priorityclassで別途削除する必要があることを確認した
CKA 試験で PriorityClass が出題される場合、「作成」と「Pod への適用」が主な問われ方です。apiVersion: scheduling.k8s.io/v1(apps/v1 や v1 ではない点に注意)と spec ではなくトップレベルに value フィールドを書く構造を試験前に必ず復習してください。
まとめ・現場ヒヤリハット・理解度チェック
第7回のまとめ
第7回で習得した内容を整理します。
- taint と toleration の仕組み:
kubectl taint nodesで taint の付与・削除ができる。effect 3 種(NoSchedule / PreferNoSchedule / NoExecute)のうち、NoExecuteのみが既存 Pod を evict する。toleration のoperator: Equal(キーと値の一致)/operator: Exists(キーの存在のみ)の使い分けを習得した - CP ノードの kubeadm デフォルト taint:
node-role.kubernetes.io/control-plane:NoScheduleが 3 CP 全ノードに設定されており、toleration を書かない限り一般 Pod は CP に配置されない - 複数 taint と toleration: 1 ノードに複数の taint が設定された場合、Pod はすべての taint に対応する toleration が必要(AND 条件)。
tolerationSecondsで NoExecute の猶予時間を設定できる - nodeSelector と nodeAffinity: nodeSelector はシンプルなキーバリュー一致のみ対応。nodeAffinity は required(ハード)/ preferred(ソフト)と 6 種の operator(In / NotIn / Exists / DoesNotExist / Gt / Lt)を使いこなせる。
Gt/Ltは nodeAffinity 専用で podAffinity には使えない - nodeAffinity の複合条件: nodeSelectorTerms の要素同士は OR、1 つの term 内の matchExpressions 同士は AND。preferred の weight(1〜100)で複数条件の優先度を設定できる
- podAntiAffinity による分散配置:
topologyKey: kubernetes.io/hostname+requiredDuringSchedulingIgnoredDuringExecutionで 2 レプリカを別ノードに強制分散できる。「レプリカ数 > ノード数」で Pending が発生するリスクを実機で確認した - PriorityClass の作成と適用:
scheduling.k8s.io/v1の PriorityClass を作成し、Pod のpriorityClassNameフィールドで適用する。PriorityClass は Cluster スコープのリソースで Namespace 削除では消えない。preemption の仕組み(高優先度 Pod → 低優先度 Pod を graceful termination で退避 → スケジュール完了)を概念で理解した - スケジューラーの 2 フェーズ処理: Filtering(taint/nodeSelector/required affinity での除外)→ Scoring(preferred affinity/PriorityClass でのスコアリング)の流れを理解した。Filtering で候補ゼロになると Pod が Pending になる
第7回で学んだ機構はすべて相互に組み合わせて使えます。例えば「GPU 専用ノードに taint を設定し(GPU 不要の Pod を排除)、GPU 使用 Pod には toleration を設定し(GPU ノードに配置を許可)、さらに podAntiAffinity で 2 レプリカを別 GPU ノードに分散させ(可用性確保)、PriorityClass でミッションクリティカルな処理に高優先度を割り当てる(リソース競合時の優先確保)」という設計が可能です。こうした複合設計を単一のマニフェストで表現できることが Kubernetes スケジューラーの設計上の特長です。
第7回を終えての実務への接続
第7回で学んだスケジューリング制御機構は、Kubernetes クラスタを「ただ動く環境」から「意図どおりに動く環境」に昇格させるための重要な手段です。
実際の業務シナリオとの対応を整理します。fanclub-api の 2 Backend Pod が k8s-wl-01 に集中していた状態(第5回 drain 演習の副作用)は、podAntiAffinity を適用することで解消できます。ただし本回では fanclub-api の Helm values 変更は演習スコープ外としたため、第14回(Helm + Kustomize + ArgoCD GitOps)でこの設定変更を Helm values として管理する際に改めて取り組む予定です。
PriorityClass については、第12回(Longhorn + PV/PVC)でストレージ集約型 Pod を優先スケジュールする設計や、第13回(Prometheus + Grafana)でモニタリングコンポーネントに適切な優先度を割り当てる設計と連携します。スケジューリング制御を「その場限りの設定」ではなく「アーキテクチャの一部」として設計する視点を持つことが、立派な Kubernetes エンジニアへの道です。
CKA 試験対策まとめ — 第7回の出題ポイント
CKA D2「Workloads and Scheduling」における第7回カバー範囲の試験ポイントを整理します。試験直前の確認にも活用してください。
| 出題テーマ | 試験で問われる操作 | ハマりやすいポイント |
|---|---|---|
| taint 付与 | kubectl taint nodes <name> key=value:effect を正確に書く | key=value:effect の記法(: の位置を誤りやすい) |
| taint 削除 | 末尾に - を付ける(key=value:effect-) | - を忘れて taint が残ったまま進める |
| toleration の作成 | key / operator / value / effect の 4 フィールドを正確に書く | operator: Exists のとき value フィールドを書かない(書くとエラー) |
| nodeSelector の追加 | 既存 Pod/Deployment の spec.nodeSelector に追記する | Pod は再起動が必要(Deployment は rollout restart) |
| nodeAffinity の設定 | required/preferred を問題文の条件に合わせて選ぶ | フィールド名が長いためスペルミスに注意 |
| podAntiAffinity の設定 | Deployment の spec.template.spec.affinity に追記する | labelSelector の matchLabels が Pod ラベルと一致しているか確認 |
| PriorityClass の作成 | YAML マニフェストで作成して kubectl apply する | apiVersion が scheduling.k8s.io/v1(v1 系でも apps/v1 でもない) |
| PriorityClass の適用 | Pod の spec.priorityClassName に設定する | priorityClassName は spec 直下(containers と同レベル) |
CKA 試験環境では kubectl explain コマンドと Kubernetes 公式ドキュメントの参照が許可されています。長いフィールド名(requiredDuringSchedulingIgnoredDuringExecution など)は公式ドキュメントのサンプルからコピーする方針が有効です。試験前に以下の公式ドキュメント URL をブックマークしておくことを推奨します。
- Taints and Tolerations: https://kubernetes.io/docs/concepts/scheduling-eviction/taint-and-toleration/
- Assigning Pods to Nodes(nodeSelector / nodeAffinity / podAffinity): https://kubernetes.io/docs/concepts/scheduling-eviction/assign-pod-node/
- Pod Priority and Preemption: https://kubernetes.io/docs/concepts/scheduling-eviction/pod-priority-preemption/
次回予告
第8回では HPA(Horizontal Pod Autoscaler)・ResourceQuota・LimitRange を扱います。fanclub-api Backend に HPA を設定し、CPU 負荷に応じた自動スケールを実機で確認します。第6回で学んだ ResourceQuota をさらに詳しく掘り下げ、LimitRange によるデフォルトリソース制限の設定も実践します。CKA D2「Configure resource limits and policies」に対応する回です。
現場ヒヤリハット① CP に toleration なし Pod を意図せず配置してしまった
状況: 本番クラスタで「Pod を特定ノードに固定したい」という要件があり、急いで nodeSelector を設定しようとした。nodeSelector の設定を誤って「どのノードでも可」の状態になった Pod が、なぜか Control Plane Node に配置されてしまった。CPU とメモリリソースが逼迫しているのに kube-system コンポーネントと同居している状況が発生した。
原因: コピーアンドペーストしたサンプルコードに CP ノード用の toleration が含まれていた。具体的には以下のような toleration が意図せず残存していた。
tolerations:
- key: "node-role.kubernetes.io/control-plane"
  operator: "Exists"
  effect: "NoSchedule"
この toleration が有効になったことで、node-role.kubernetes.io/control-plane:NoSchedule taint を持つ CP Node への配置が許可された。nodeSelector の設定ミスと不要な toleration の組み合わせが問題を引き起こした。
対処: kubectl get pod <name> -o yaml | grep -A5 tolerations でマニフェストを確認 → 不要な toleration を削除した Deployment に更新 → kubectl rollout restart で再スケジュール。Pod が Workload Node に移動したことを kubectl get pod -o wide で確認した。
教訓: Pod が意図しないノード(特に CP)に配置されている場合、マニフェストに不要な toleration が含まれていないかを確認する。kubectl describe pod <name> の Node フィールドと Tolerations フィールドをセットで確認する習慣をつけてください。サンプルコードからのコピーアンドペースト時は toleration フィールドを必ずレビューしてください。また、CI/CD パイプラインで Deployment マニフェストを静的検証する際に「CP Node への toleration が含まれていないか」をチェックするルールを追加することで、本番環境への流入を防げます。
現場ヒヤリハット② podAntiAffinity 過剰で本番環境の全 Pod が Pending になった
状況: 本番環境で fanclub-api の可用性を高めるため、Deployment に requiredDuringSchedulingIgnoredDuringExecution の podAntiAffinity を設定した。その後、負荷が増加したため kubectl scale でレプリカ数を 2 から 4 に増やしたところ、3 Pod 目と 4 Pod 目が永遠に Pending になった。
原因: Workload Node が 2 台しかなく、3 Pod 目は「k8s-wl-01 にも k8s-wl-02 にも anti-affinity ルールに引っかかる」状態になっていた。kubectl describe pod の Events に 0/2 nodes are available: 2 node(s) didn't match pod anti-affinity rules と表示されていた。
対処: preferredDuringSchedulingIgnoredDuringExecution に変更して再適用した。3 Pod 目以降はベストエフォートで分散するようになり Pending が解消した。
教訓: requiredDuringScheduling の podAntiAffinity は「Workload Node 数 >= レプリカ数」を常に満たせる場合のみ採用する。HPA でレプリカ数が自動増加するシナリオでは、最大レプリカ数がノード数を超えないか事前に計算してください。安全策として preferredDuringScheduling を選ぶか、topologySpreadConstraints の活用を検討します。
また、podAntiAffinity を設定した Deployment に HPA を組み合わせる場合は必ず以下を確認してください。
- HPA の
maxReplicasが Workload Node 数以下であること(requiredDuringScheduling の場合) - または podAntiAffinity を
preferredDuringSchedulingに変更して Pending を回避すること - Pending になった Pod は HPA の計算に影響しない(Running Pod のみを対象にスケーリングが行われる)ため、Pending Pod が累積すると意図しないリソース消費が発生する
理解度チェック
第7回の理解度を ○× 形式の 8 問で確認します。まず問題を読み、自分なりに答えを出してから解説を読んでください。
- 問 1: taint の effect
NoScheduleを付与しただけで、既存の稼働中 Pod は自動的に evict される - 問 2: toleration の
operator: Existsは、key と value が一致した場合に toleration が有効になる - 問 3: nodeAffinity の
requiredDuringSchedulingIgnoredDuringExecutionは、条件を満たすノードが存在しない場合 Pod が Pending になる - 問 4: nodeAffinity の operator
GtとLtは podAffinity にも使用できる - 問 5: podAntiAffinity(required)で
topologyKey: kubernetes.io/hostnameを設定した Deployment に、ノード数を超えるレプリカ数を設定すると全 Pod が Running になる - 問 6:
PriorityClassは Namespace に属するリソースである - 問 7: kubeadm でインストールした Control Plane Node には、デフォルトで
node-role.kubernetes.io/control-plane:NoScheduletaint が設定される - 問 8:
preemptionPolicy: Neverの PriorityClass を持つ Pod は、リソース不足のとき低優先度 Pod を退避することなく待機する
問 1: × — NoSchedule taint は「新規 Pod の配置を拒否する」effect であり、既存の稼働中 Pod には影響しません。既存 Pod を evict するのは NoExecute のみです。演習①の Step 5 でこの動作の違いを実機で確認しました。「NoSchedule を付けたのに既存 Pod が消えない」という疑問は、この動作を理解することで解消されます。既存 Pod を退避させたい場合は NoExecute を使うか、手動で kubectl delete pod を実行する必要があります。
問 2: × — operator: Exists はキーが存在するだけで toleration が有効になります。value フィールドは不要であり、書いても無視されます。キーと値の両方が一致する場合に有効になるのは operator: Equal(デフォルト)です。
問 3: ○ — required はハード制約です。条件を満たすノードがなければ Pod はスケジューラーに配置先を見つけられず Pending になります。条件が満たせない場合でも他のノードに配置されるのは preferred(ソフト制約)の動作です。Pending になった Pod は kubectl describe pod の Events に「0/N nodes are available: N node(s) didn’t match node affinity」と表示されます。原因が nodeAffinity の required 条件であることを Events から読み取る練習をしてください。
問 4: × — Gt と Lt は nodeAffinity 専用の operator です。podAffinity / podAntiAffinity の matchExpressions では使用できません。nodeAffinity ではノードのラベル値を整数として大小比較できますが、podAffinity では Pod のラベル値を整数比較する仕組みはありません。
問 5: × — ノード数(2)を超えるレプリカ数(3 以上)を設定すると、3 Pod 目以降は「どのノードにも anti-affinity ルールに引っかかる」状態になり Pending になります。演習②の Step 3 でこの動作を実機で確認しました。この問題を回避するには、preferredDuringScheduling を使ってソフト制約にするか、Workload Node を増設してレプリカ数と同数以上のノードを確保する必要があります。
問 6: × — PriorityClass は Cluster スコープのリソースです。Namespace に属しません。このため、Namespace を削除しても PriorityClass は残存します。演習③の Step 4 で Namespace 削除後に別途 kubectl delete priorityclass を実行したのはこの理由です。
問 7: ○ — kubeadm init 時に Control Plane Node には node-role.kubernetes.io/control-plane:NoSchedule taint が自動付与されます。これが「一般 Pod が CP に配置されない」理由です。演習開始前の確認コマンドでこの taint を実機で観察しました。
問 8: ○ — preemptionPolicy: Never を設定した PriorityClass の Pod は、リソース不足の場合でも低優先度 Pod を退避せず、リソースが空くまで待機します。PreemptLowerPriority(デフォルト)との違いは「自分のスケジュールのために他の Pod を退避するかどうか」です。バッチジョブのように「他の Pod に影響を与えずにリソースが空いたら動く」という要件に適しています。
シリーズ一覧
第1部:クラスタ構築
- 第1回 第2巻スコープ + CKA 試験形式紹介 + kubeadm 概要 + kubeadm vs RKE2/k0s/OKD 概観
- 第2回 kubeadm シングルノード起動(pkgs.k8s.io + kubeadm init + Calico CNI)+ alma-proxy whitelist 構築
- 第3回 kubeadm HA 設計 + HAProxy LB(API Server LB 構成)
- 第4回 kubeadm HA クラスタ構築(CP×3 + WL×2)+ fanclub-api HA 移行
- 第5回 etcd backup/restore(etcdutl)+ ノード drain/uncordon
第2部:ワークロード管理
- 第6回 kubeadm upgrade + ノード drain/cordon + ミニトラブルシュート演習
- 第7回 Pod スケジューリング(taint/toleration/affinity/anti-affinity/PriorityClass)← 今ここ
- 第8回 HPA + ResourceQuota + LimitRange
第3部:ネットワーク
- 第9回 Service 詳細 + MetalLB(LoadBalancer 動作確認)
- 第10回 NetworkPolicy 詳細 + Calico/Cilium 比較 + ミニトラブルシュート演習
- 第11回 Gateway API + Traefik + cert-manager + CoreDNS(HTTPS 公開完成)
第4部:ストレージ
第5部:監視・運用
- 第13回 Prometheus + Grafana + Loki + Fluent Bit + fanclub-api 監視ダッシュボード
- 第14回 Helm + Kustomize でクラスタコンポーネント install + ArgoCD GitOps + Velero backup